本APP采用了MVP+RXJAVA的架构。是一款基于WanAndroid网站内容进行开发的应用。 鸿洋大佬在WanAndroid网站上提供了网站的API。你可以点进去查看API的具体文档。
需求设计
在写APP之前,我们应当首先思考下这个APP应该要实现什么功能。看了一下API文档,我们能够提取出以下基本需求(不包括API所有需求)。
- 能够实现用户登录/注册,持久化cookies
- 能够获取首页Banner数据并显示
- 能够获取文章类别(也就是文章体系数据)并显示
- 能够收藏/取消收藏文章,并成功与后台数据同步
- 能够获取文章列表(分别包括首页文章、类别文章、收藏文章)并显示
- 能够获取热词,并通过热词/用户自己的关键词搜索,来正确获取搜索文章列表进行显示
- 能够获取项目分类并显示
- 能够获取项目类别文章
下面是我自己提出的附加需求
- 实现夜间模式
- 添加“稍后再读”功能
- 实现桌面小部件,用于显示那些稍后再读的文章
数据API分析
功能需求设计好后,我们对这个APP也能去规划一个大概的蓝图了。APP都是建立在数据的基础之上的,所以对API的分析是一个很重要的模块。我们来看下WanAndroid API究竟给了我们什么样的数据。
以首页文章列表API为例
http://www.wanandroid.com/article/list/0/json
{
"data": {
    "curPage": 1,
    "datas": [
        {
            "apkLink": "",
            "author": "leon2017",
            "chapterId": 294,
            "chapterName": "完整项目",
            "collect": false,
            "courseId": 13,
            "desc": "本App是基于谷歌推出的Android Jetpack架构组件的干货集中营, app功能很简单, 基本上是针对 LiveData + ViewModel + Navigation + Paging 的MVVM的练手demo,更多的强大功能,请参考google的官方api\r\n\r\n",
            "envelopePic": "http://www.wanandroid.com/blogimgs/b38258d1-fa8c-49ca-836b-41585eea1011.png",
            "fresh": false,
            "id": 3117,     //文章id,可用于收藏/取消收藏
            "link": "http://www.wanandroid.com/blog/show/2208",  //文章链接
            "niceDate": "2018-07-08",
            "origin": "",
            "projectLink": "https://github.com/leon2017/GankJetpack",
            "publishTime": 1531059687000,
            "superChapterId": 294,
            "superChapterName": "开源项目主Tab",
            "tags": [
                {
                    "name": "项目",
                    "url": "/project/list/1?cid=294"
                }
            ],
            "title": "Android Jetpack架构组件的干货集中营  GankJetpack",
            "type": 0,
            "userId": -1,
            "visible": 1,
            "zan": 0
        },.......
    ],
    "offset": 0,
    "over": false,    //false表示还有下一页,true则表示本页是最后一页
    "pageCount": 73,  //总页数
    "size": 20,       //每一页所能显示的最大文章数
    "total": 1454     //总文章数
  },
  "errorCode": 0,
  "errorMsg": ""
}
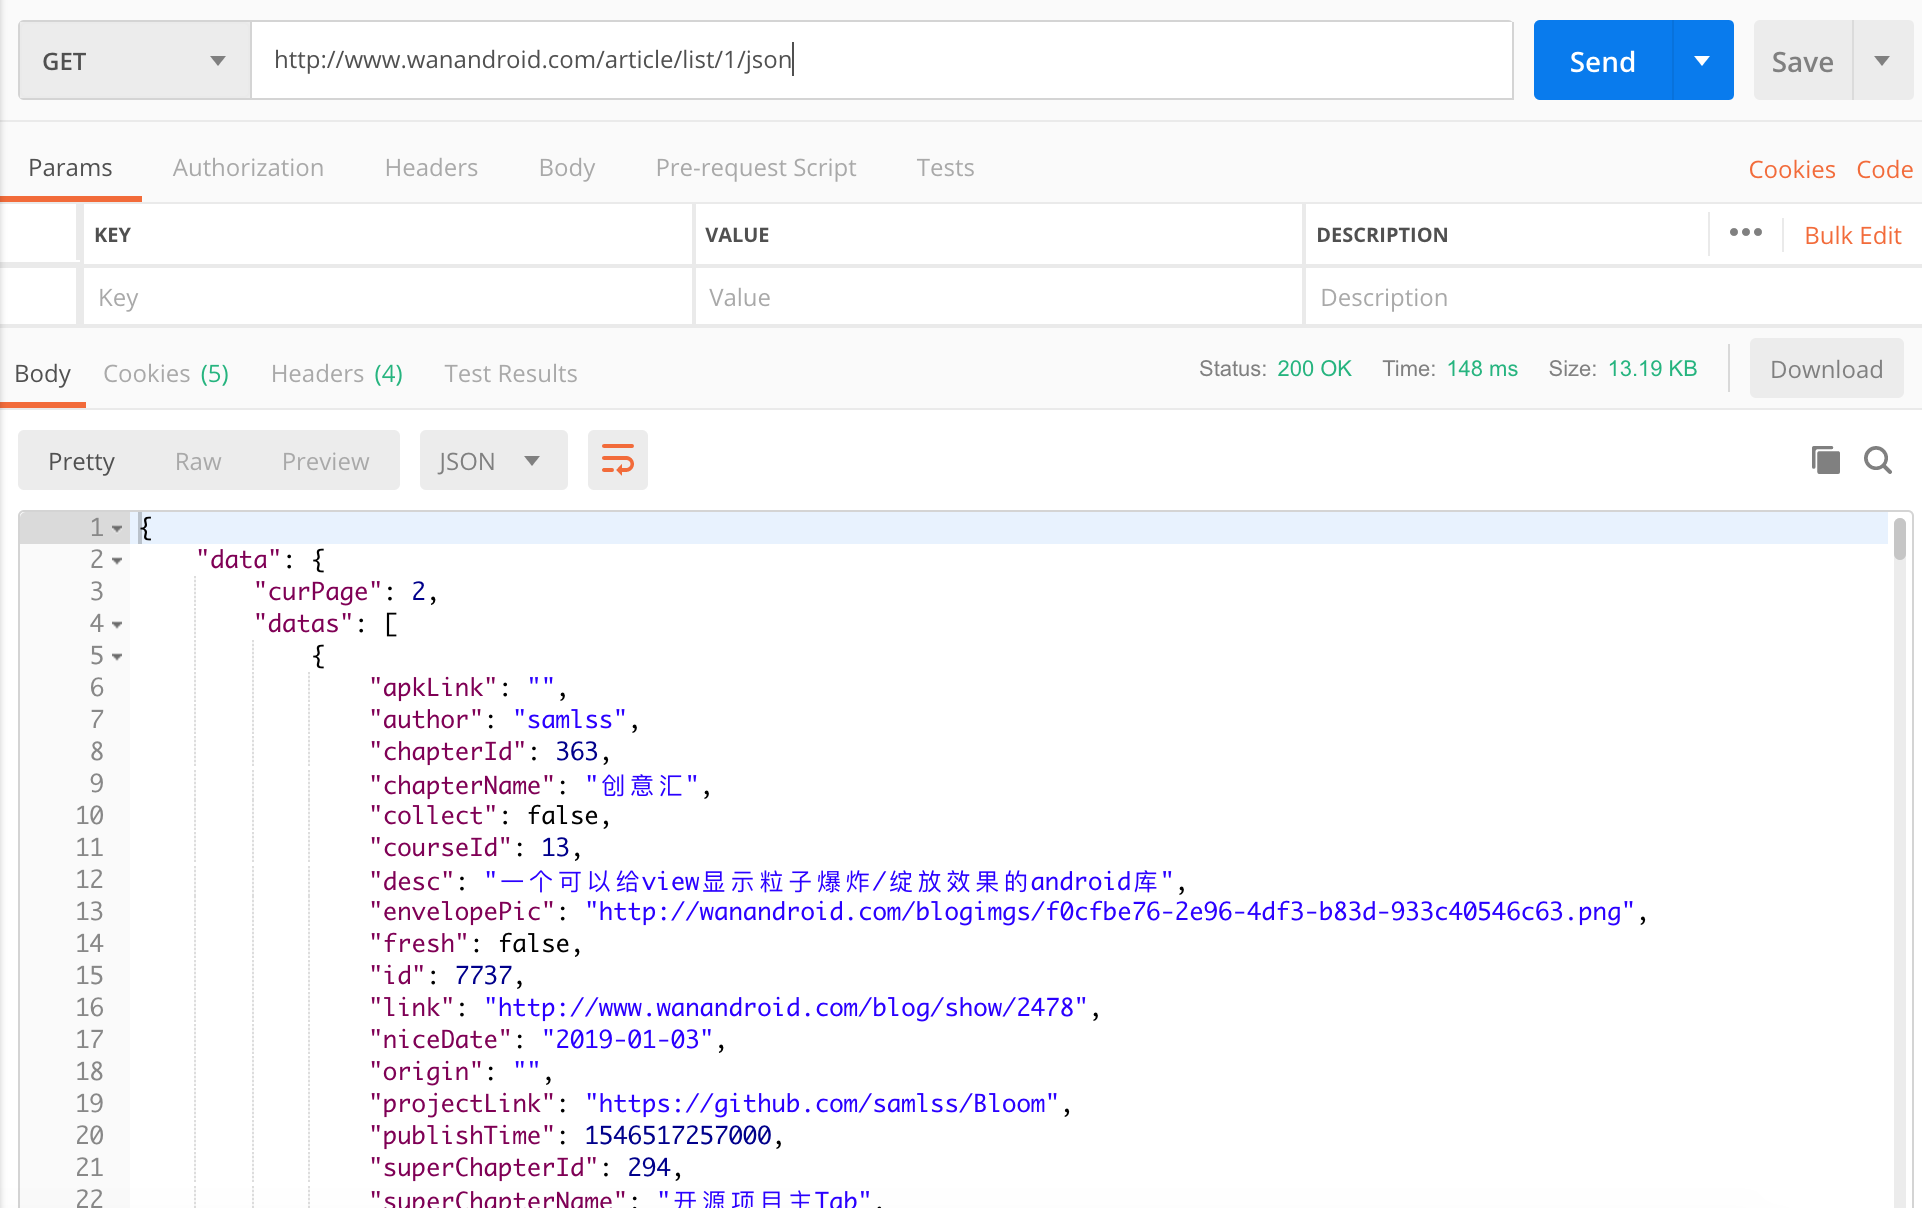
从返回的数据我们可以看到文章的id,title,link等数据,要获取文章详细内容很简单,打开它的link链接就好。 这里要推荐下一款好用的网页调试软件Postman。当你在postman发送相关的API后,Postman就会返回可读性强的结果。

界面UI设计
- LauncherIcon 你可以在Android Asset Studio上生成自己喜欢的Launcher Icon图标
- 界面里的图标Icon 为了遵循Material Design, 尽量在AS自带的图标里选取
- 界面设计元素的布局规范与标准 考虑到404的情况,这里有一份中文文档Material Design 中文版,当然里面的内容不是最新最全的,不过也能满足大部分需求了
在本APP的设计中,我用Drawer作为顶级导航,BottomNavigationView作为二级导航,三级导航是TabLayout。界面的设计效果如下。
代码编写(以首页文章为例)
Bean类代码编写(只显示关键代码)
根据API我们可以获取相应的JSON数据,现在做的就是把这些数据转化成Bean类 ArticleData
public class ArticlesData {

    @Expose
    @SerializedName("errorCode")
    private int errorCode;
    @Expose
    @SerializedName("errorMsg")
    private String errorMsg;

    @Expose
    @SerializedName("data")
    private Data data;

    public class Data{
        @Expose
        @SerializedName("datas")
        private List<ArticleDetailData> datas;
        @Expose
        @SerializedName("offset")
        private int offset;
        @Expose
        @SerializedName("over")
        private boolean over;
        @Expose
        @SerializedName("pageCount")
        private int pageCount;
        @Expose
        @SerializedName("size")
        private int size;
        @Expose
        @SerializedName("total")
        private int total;
    }
}
public class ArticleDetailData extends RealmObject {

    @Expose
    @SerializedName("author")
    private String author;
    @Expose
    @SerializedName("chapterId")
    private int chapterId;
    @Expose
    @SerializedName("chapterName")
    private String chapterName;
    @Expose
    @SerializedName("id")
    @PrimaryKey
    private int id;
    @Expose
    @SerializedName("link")
    private String link;
    @Expose
    @SerializedName("niceDate")
    private String niceDate;
    @Expose
    @SerializedName("title")
    private String title;
    /*
    ...省略了部分属性
    */
}
网络请求库代码编写(只显示关键代码)
在网络请求框架上我选择的是Retrofit+RxJava。首先就是写API
public class Api {

   //This is the base API.
   public static final String API_BASE = "http://www.wanandroid.com/";

   //Get the article list
   public static final String ARTICLE_LIST = API_BASE + "article/list/";
}
接下来是创建相关的Retrofit文件。
public class RetrofitClient {
    private RetrofitClient() {
    }

    private static class ClientHolder{

        private static OkHttpClient okHttpClient = new OkHttpClient.Builder()
                .cookieJar(new CookieManger(App.getContext()))
                .build();


        private static Retrofit retrofit = new Retrofit.Builder()
                .baseUrl(Api.API_BASE)
                .client(okHttpClient)
                .addCallAdapterFactory(RxJava2CallAdapterFactory.create())
                .addConverterFactory(GsonConverterFactory.create())
                .build();

    }

    public static Retrofit getInstance(){
        return ClientHolder.retrofit;
    }
}
public interface RetrofitService {

   @GET(Api.ARTICLE_LIST + "{page}/json")
   Observable<ArticlesData> getArticles(@Path("page") int page);

}
你可能会问什么是Rxjava,Rxjava就是在观察者模式的骨架下,通过丰富的操作符和便捷的异步操作来完成对于复杂业务的处理的框架。可以参考扔物线写的《给 Android 开发者的 RxJava 详解》,需要指出的是里面有些内容是过时的,不过这篇文章对RxJava讲的很浅显易懂,所以还是推荐它用于入门。
Model层构建(只显示关键代码)
public interface ArticlesDataSource {

    Observable<List<ArticleDetailData>> getArticles(@NonNull int page, @NonNull boolean forceUpdate, @NonNull boolean clearCache);

}
public class ArticlesDataRemoteSource implements ArticlesDataSource {
    @NonNull
    private static ArticlesDataRemoteSource INSTANCE;

    private ArticlesDataRemoteSource(){

    }

    public static ArticlesDataRemoteSource getInstance(){
        if (INSTANCE == null) {
            INSTANCE = new ArticlesDataRemoteSource();
        }
        return INSTANCE;
    }


    @Override
    public Observable<List<ArticleDetailData>> getArticles(@NonNull  int page, @NonNull boolean forceUpdate, @NonNull boolean clearCache) {
        return RetrofitClient.getInstance()
                .create(RetrofitService.class)
                .getArticles(page)
                .filter(new Predicate<ArticlesData>() {
                    @Override
                    public boolean test(ArticlesData articlesData) throws Exception {
                        return articlesData.getErrorCode() != -1;
                    }
                })
                .flatMap(new Function<ArticlesData, ObservableSource<List<ArticleDetailData>>>() {
                    @Override
                    public ObservableSource<List<ArticleDetailData>> apply(ArticlesData articlesData) throws Exception {
                        return Observable.fromIterable(articlesData.getData().getDatas()).toSortedList(new Comparator<ArticleDetailData>() {
                            @Override
                            public int compare(ArticleDetailData articleDetailData, ArticleDetailData t1) {
                                return SortDescendUtil.sortArticleDetailData(articleDetailData, t1);
                            }
                        }).toObservable().doOnNext(new Consumer<List<ArticleDetailData>>() {
                            @Override
                            public void accept(List<ArticleDetailData> list) throws Exception {
                                for (ArticleDetailData item :list){
                                    saveToRealm(item);
                                }
                            }
                        });
                    }
                });
    }

    private void saveToRealm(@NonNull ArticleDetailData article){
        // It is necessary to build a new realm instance
        // in a different thread.
        Realm realm = Realm.getInstance(new RealmConfiguration.Builder()
                .name(RealmHelper.DATABASE_NAME)
                .deleteRealmIfMigrationNeeded()
                .build());
        realm.beginTransaction();
        realm.copyToRealmOrUpdate(article);
        realm.commitTransaction();
        realm.close();
    }


}
public class ArticlesDataRepository implements ArticlesDataSource{

    @NonNull
    private ArticlesDataSource remoteDataSource;

    private Map<Integer, ArticleDetailData> articlesCache;


    private final int INDEX = 0;

    @NonNull
    public static ArticlesDataRepository INSTANCE;

    private ArticlesDataRepository(@NonNull ArticlesDataSource remoteDataSource ){
        this.remoteDataSource = remoteDataSource;
    }


    public static ArticlesDataRepository getInstance(@NonNull ArticlesDataSource remoteDataSource){
        if (INSTANCE == null) {
            INSTANCE = new ArticlesDataRepository(remoteDataSource);
        }
        return INSTANCE;
    }

    @Override
    public Observable<List<ArticleDetailData>> getArticles(@NonNull final int page, @NonNull final boolean forceUpdate, @NonNull final boolean clearCache) {
    //从ArticlesDataRemoteSource里获取数据
        return remoteDataSource.getArticles(INDEX, forceUpdate, clearCache);

    }

}
在ArticlesDataRemoteSource类里,对获取到的数据进行了存储。使用的是Realm,Realm是一个NoSQL的移动端数据库框架,具体内容,你可以参考Tonny大佬写的文章《Realm 在 Android 上的应用》。当然,如果你英语还过得去的话,也可以直接参考这个Realm官方DOC。在这里我就说下几个比较容易踩的坑:
- 相关实体类要继承RealmObject
- 相关实体类不能有内部类,变量中有List的要写成RealmList
- 增删改查等操作里,Realm只能是局部变量
- 增删改完成后要及时调用realm.close();
界面代码编写(只显示关键代码)
APP大致的界面搭建是这样的,我们就完成首页的搭建就好。
<android.support.v4.widget.DrawerLayout xmlns:android="http://schemas.android.com/apk/res/android"
    xmlns:app="http://schemas.android.com/apk/res-auto"
    xmlns:tools="http://schemas.android.com/tools"
    android:id="@+id/drawer_layout"
    android:layout_width="match_parent"
    android:layout_height="match_parent"
    android:fitsSystemWindows="true"
    tools:context=".MainActivity"
    tools:openDrawer="start">

    <include
        layout="@layout/app_bar_main"
        android:layout_width="match_parent"
        android:layout_height="match_parent" />

    <android.support.design.widget.NavigationView
        android:id="@+id/nav_view"
        android:layout_width="wrap_content"
        android:layout_height="match_parent"
        android:layout_gravity="start"
        android:fitsSystemWindows="true"
        android:background="@color/layout_background"
        app:headerLayout="@layout/nav_header"
        app:itemIconTint="@drawable/nav_item_color"
        app:itemTextColor="@drawable/nav_item_color"
        app:menu="@menu/nav_view_menu" />

</android.support.v4.widget.DrawerLayout>
app_bar_main,其中的FrameLayout就是我们TimeLineFragment的父容器了
<LinearLayout xmlns:android="http://schemas.android.com/apk/res/android"
    xmlns:app="http://schemas.android.com/apk/res-auto"
    android:layout_width="match_parent"
    android:layout_height="match_parent"
    android:orientation="vertical">

    <android.support.v7.widget.Toolbar
        android:id="@+id/toolBar"
        android:layout_width="match_parent"
        android:layout_height="?attr/actionBarSize"
        android:background="@color/colorPrimary"
        android:theme="@style/AppTheme.AppBarOverlay"
        app:popupTheme="@style/AppTheme.PopupOverlay" />


    <FrameLayout
        android:id="@+id/frame_layout"
        android:layout_width="match_parent"
        android:layout_height="0dp"
        android:layout_weight="1"
        android:background="@color/layout_background" />

    <android.support.design.widget.BottomNavigationView
        android:id="@+id/bottom_navigation_view"
        android:layout_width="match_parent"
        android:layout_height="wrap_content"
        android:background="@color/layout_background"
        app:elevation="8dp"
        app:itemIconTint="@drawable/nav_item_color"
        app:itemTextColor="@drawable/nav_item_color"
        app:menu="@menu/nav_bottom_menu" />


</LinearLayout>
<android.support.design.widget.CoordinatorLayout xmlns:android="http://schemas.android.com/apk/res/android"
    xmlns:app="http://schemas.android.com/apk/res-auto"
    android:layout_width="match_parent"
    android:layout_height="match_parent">

    <android.support.design.widget.AppBarLayout
        android:layout_width="match_parent"
        android:layout_height="wrap_content">

        <android.support.design.widget.TabLayout
            android:id="@+id/tab_layout"
            android:layout_width="match_parent"
            android:layout_height="wrap_content"
            app:tabBackground="@color/layout_background"
            app:tabGravity="fill"
            app:tabIndicatorColor="@color/colorPrimary"
            app:tabSelectedTextColor="@color/colorPrimary"
            app:tabTextColor="@color/colorPrimaryText" />
    </android.support.design.widget.AppBarLayout>


    <android.support.v4.view.ViewPager
        android:id="@+id/view_pager"
        android:layout_width="match_parent"
        android:layout_height="match_parent"
        app:layout_behavior="@string/appbar_scrolling_view_behavior" />
</android.support.design.widget.CoordinatorLayout>
fragment_timeline_page,没错,这就是ArticlesFragment的界面
<android.support.design.widget.CoordinatorLayout xmlns:android="http://schemas.android.com/apk/res/android"
    xmlns:app="http://schemas.android.com/apk/res-auto"
    xmlns:tools="http://schemas.android.com/tools"
    android:layout_width="match_parent"
    android:layout_height="match_parent">

    <android.support.v4.widget.SwipeRefreshLayout
        android:id="@+id/refresh_layout"
        android:layout_width="match_parent"
        android:layout_height="match_parent">

        <FrameLayout
            android:layout_width="match_parent"
            android:layout_height="match_parent"
            android:background="@color/layout_background">

            <android.support.v4.widget.NestedScrollView
                android:id="@+id/nested_scroll_view"
                android:layout_width="match_parent"
                android:layout_height="match_parent">

                <LinearLayout
                    android:layout_width="match_parent"
                    android:layout_height="match_parent"
                    android:orientation="vertical">


                    <android.support.v7.widget.RecyclerView
                        android:id="@+id/recycler_view"
                        android:layout_width="match_parent"
                        android:layout_height="match_parent"
                        android:layout_marginBottom="@dimen/activity_margin_quarter"
                        android:layout_marginTop="@dimen/activity_margin_quarter"
                        android:fadeScrollbars="false"
                        android:nestedScrollingEnabled="false"
                        android:scrollbars="vertical"
                        android:visibility="visible"
                        tools:listitem="@layout/item_article" />
                </LinearLayout>

            </android.support.v4.widget.NestedScrollView>

            <LinearLayout
                android:id="@+id/empty_view"
                android:layout_width="match_parent"
                android:layout_height="match_parent"
                android:gravity="center"
                android:orientation="vertical"
                android:visibility="invisible">

                <android.support.v7.widget.AppCompatImageView
                    android:layout_width="36dp"
                    android:layout_height="36dp"
                    android:hapticFeedbackEnabled="true"
                    android:src="@drawable/ic_empty_img_24dp"
                    android:tint="@color/colorPrimary" />

                <android.support.v7.widget.AppCompatTextView
                    style="@style/TextAppearance.AppCompat.Body1"
                    android:layout_width="wrap_content"
                    android:layout_height="wrap_content"
                    android:layout_marginTop="@dimen/activity_vertical_margin"
                    android:text="@string/empty_text"
                    android:textColor="@color/colorPrimary" />
            </LinearLayout>

        </FrameLayout>

    </android.support.v4.widget.SwipeRefreshLayout>

</android.support.design.widget.CoordinatorLayout>
View层和Present层
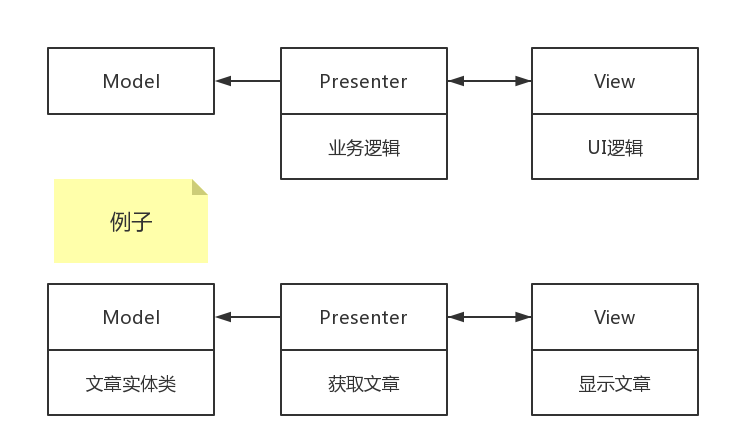
既然采用的是MVP+RXJAVA,如果你对此不是很懂的话,可以看下谷歌的官方项目todo‑mvp‑rxjava。MVP就指的是Mpdel-View-Present。MVP模式的核心思想就是把视图中的UI逻辑抽象成View接口,把业务逻辑抽象成Presenter接口。也就是视图就只负责显示,其它的逻辑都交给了Presenter。这样就大大降低了代码的耦合,提高代码的可阅读性。  Model层我们前面已经写好了,那么就剩下View层和Present层了。首先就是写BasePresenter和BaseView。 BasePresenter
public interface BasePresenter {
    void subscribe();

    void unSubscribe();
}
public interface BaseView<T> {
    void initViews(View view);

    void setPresenter(T presenter);
}
ArticlesContract, 契约类
public interface ArticlesContract {

    interface Presenter extends BasePresenter{

        void getArticles(int page, boolean forceUpdate, boolean clearCache);

    }

    interface View extends BaseView<Presenter>{

        boolean isActive();

        void setLoadingIndicator(boolean isActive);

        void showArticles(List<ArticleDetailData> list);

        void showEmptyView(boolean toShow);


    }
}
ArticlesPresenter, 从Model层获取数据
public class ArticlesPresenter implements ArticlesContract.Presenter {
    private CompositeDisposable compositeDisposable;
    private ArticlesContract.View view;
    private ArticlesDataRepository articleRepository;

    public ArticlesPresenter(ArticlesContract.View view,ArticlesDataRepository articleRepository){
        this.articleRepository = articleRepository;
        this.view = view;
        this.view.setPresenter(this);
        compositeDisposable = new CompositeDisposable();
    }


    @Override
    public void getArticles(int page, final boolean forceUpdate, final boolean clearCache) {
       //从ArticlesDataRepository获取数据并显示到View上
      Disposable disposable = articleRepository.getArticles(page, forceUpdate, clearCache)
            .subscribeOn(Schedulers.io())
            .observeOn(AndroidSchedulers.mainThread())
            .subscribeWith(new DisposableObserver<List<ArticleDetailData>>() {
                @Override
                public void onNext(List<ArticleDetailData> value){
                    if (view.isActive()){
                        view.showEmptyView(false);
                        view.showArticles(value);
                    }


                }

                @Override
                public void onError(Throwable e) {
                    if (view.isActive()) {
                        view.showEmptyView(true);
                        view.setLoadingIndicator(false);
                    }
                }

                @Override
                public void onComplete() {
                    if (view.isActive()){
                        view.setLoadingIndicator(false);
                    }
                }
            });
        compositeDisposable.add(disposable);
    }

    @Override
    public void subscribe() {

    }

    @Override
    public void unSubscribe() {
        compositeDisposable.clear();
    }
}
ArticlesFragment, 显示数据
public class ArticlesFragment extends Fragment implements ArticlesContract.View{

    @Nullable
    @Override
    public View onCreateView(@NonNull LayoutInflater inflater, @Nullable ViewGroup container, @Nullable Bundle savedInstanceState) {
        View view = inflater.inflate(R.layout.fragment_timeline_page, container, false);
        initViews(view);
        return view;
    }

    @Override
    public void onResume() {
        super.onResume();
        presenter.subscribe();
    }

    @Override
    public void onPause() {
        super.onPause();
        presenter.unSubscribe();
    }


    @Override
    public void initViews(View view){
    }

    @Override
    public void setPresenter(ArticlesContract.Presenter presenter) {
        this.presenter = presenter;
    }


    @Override
    public boolean isActive() {
        return isAdded()&&isResumed();
    }

    @Override
    public void setLoadingIndicator(final boolean isActive) {

    }

    @Override
    public void showArticles(final List<ArticleDetailData> list){
        //recycleview显示数据
    }

    @Override
    public void showEmptyView(boolean toShow) {

    }

}
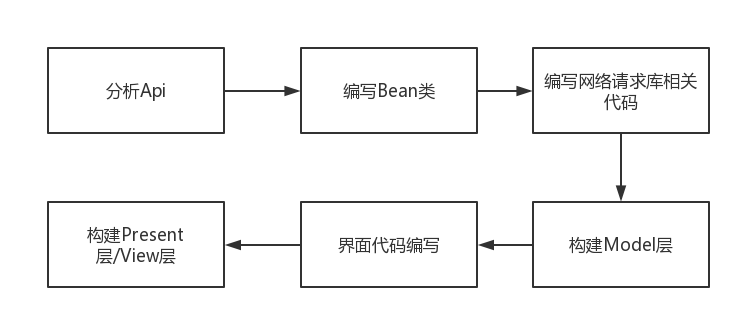
至此,我们就完成首页文章列表的基本搭建了。没有细写显示数据是因为每一个人的设计理念都不一样,每个人都有不同的实现方式。 接下来的获取收藏列表/搜索文章/获取Banner/登陆注册等操作与这部分操作没有多大差异,就不一一细说了,大致的流程如下 
收藏文章和取消收藏文章
为什么把这两个单独拿出来说呢,因为这两个比较特别。 我们首先看下API
收藏
http://www.wanandroid.com/lg/collect/1165/json

方法:POST
参数: 文章id,拼接在链接中。
取消收藏
http://www.wanandroid.com/lg/uncollect_originId/2333/json

方法:POST
参数:id 拼接在链接上
这两个API都很简单,但是你发现没有,它的参数里面没有用户的相关信息,都是文章的id,那么,后台是如何识别出用户并进行相关的收藏/取消收藏操作呢?WanAndroid的API文档已经讲得很清楚了:
注意所有收藏相关都需要登录操作,建议登录将返回的cookie(其中包含账号、密码)持久化到本地即可。
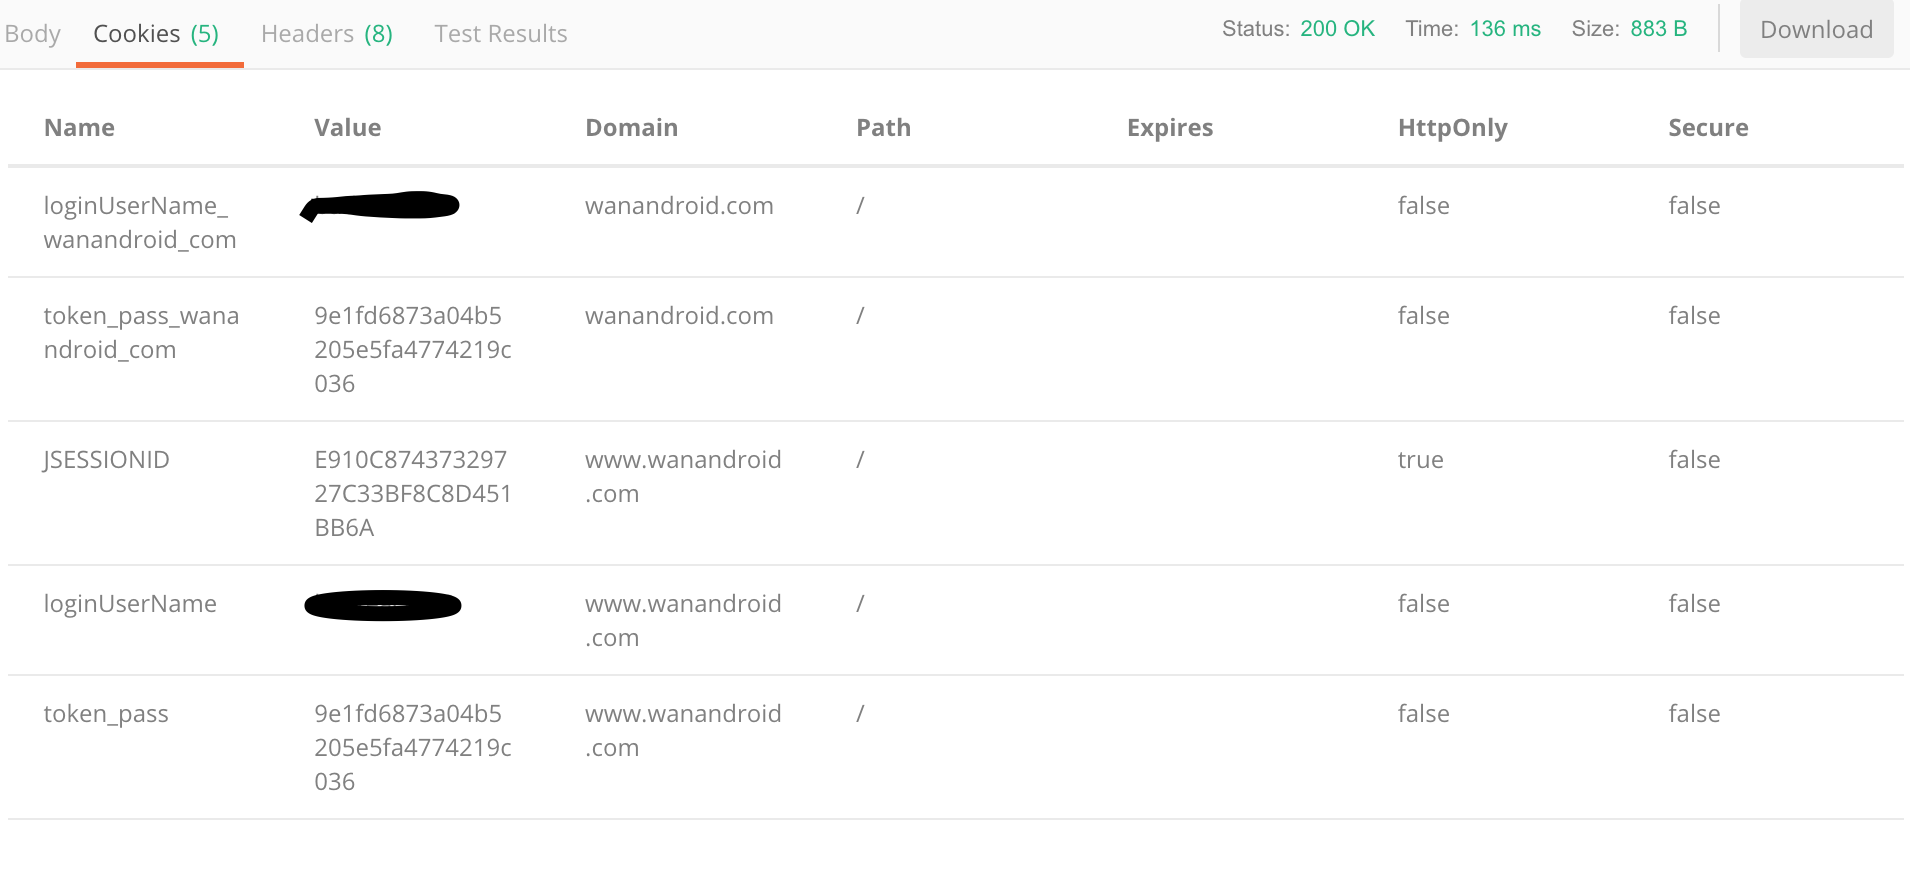
那么Cookies在哪里呢,还记得开头的PostMan吗,我们现在先在WanAndroid官网里注册一下账号。 账号:WanAndroidWan 密码:12345678
打开PostMan,用登陆的API http://www.wanandroid.com/user/login/?username=WanAndroidWan&password=12345678 进行登陆操作,查看Cookies,如图  这就是Cookies,它就相当于身份证,你在收藏/取消收藏的操作中都要带上这些Cookies,服务器才会正确识别你的身份并返回正确的数据,否则服务器会返回errorcode 为 -1 ,errormessage 为 “请先登录” 的错误。这就是前面那句话“建议登录将返回的cookie(其中包含账号、密码)持久化到本地”的含义。那么问题来了,如何持久化Cookies呢,由于本APP使用的是Retrofit,所以我推荐阅读下这篇文章《Retrofit 2.0 超能实践(二),Okhttp完美同步持久Cookie实现免登录》。
夜间模式的实现
关于夜间模式,我认为这是一个APP所必须实现的,毕竟能够它可以很好地 提升用户体验。 本项目夜间模式的界面如下 
1.首先我们要新建一个values-night的资源文件夹,最简单的就是把value里面的Color文件复制过来,把里面的颜色一一改成夜间模式所需要的颜色。 2.检测当前的模式,并更改储存到SharedPreference中,这是动态更改主题,你可以把这段代码放进一个控件的执行逻辑中,比如放进一个Button,点击它就可以更改当前主题,后面的recreate()是不可缺少的,因为重新设置主题需要重新创建Activity。
SharedPreferences sp = PreferenceManager.getDefaultSharedPreferences(MainActivity.this);
                        if ((getResources().getConfiguration().uiMode & Configuration.UI_MODE_NIGHT_MASK)
                                == Configuration.UI_MODE_NIGHT_YES) {
                            sp.edit().putBoolean(SettingsUtil.KEY_NIGHT_MODE, false);
                            AppCompatDelegate.setDefaultNightMode(AppCompatDelegate.MODE_NIGHT_NO);
                        } else {
                            sp.edit().putBoolean(SettingsUtil.KEY_NIGHT_MODE, true);
                            AppCompatDelegate.setDefaultNightMode(AppCompatDelegate.MODE_NIGHT_YES);
                        }
                        getWindow().setWindowAnimations(R.style.WindowAnimationFadeInOut);
                        recreate();
3.新建一个App继承Application,静态设置主题
public class App extends Application {

    @Override
    public void onCreate() {
        super.onCreate();
        if (PreferenceManager.getDefaultSharedPreferences(getApplicationContext()).getBoolean(SettingsUtil.KEY_NIGHT_MODE, false)) {
            AppCompatDelegate.setDefaultNightMode(AppCompatDelegate.MODE_NIGHT_YES);
        }else {
            AppCompatDelegate.setDefaultNightMode(AppCompatDelegate.MODE_NIGHT_NO);
        }
    }
}
4.AndroidManifest里面更改
android:name=".app.App"
如果你想深入了解对于夜间模式的实现,我推荐Tonny大佬写的文章《简洁优雅地实现夜间模式》
结语
相信看了这篇文章,你对WanAndroid的API开发已经有点了解了。本文讲述的只是一个大致的开发的流程。如果你对我的项目有兴趣,可以到项目上把源码下下来。如果这个项目对你有帮助的话,请到我的项目上给我一个Star,谢谢大家。
致谢
在这个项目中,最感谢的人就是Tonny大佬了。在安卓编程的道路上,从一个啥都不懂得小白到现在,是他一直给我指引、鼓励和信心。他对编程的热爱也深深影响了我,我也想成长为像他那样的人。在这个项目中,他给我了很多帮助,在这里对他表示最诚挚的感谢!